Friday, 11 March 2011

Recover FireFox Passwords using FireFox Password Viewer

FirePasswordViewer is the GUI version of popular FirePassword tool to recover login passwords stored by Firefox. Like other browsers, Firefox also stores the login details such as username, password for every website visited by the user at the user consent. All these secret details are stored in Firefox sign-on database securely in an encrypted format. FirePasswordViewer can instantly decrypt and recover these secrets even if they are protected with master password.
Also FirePasswordViewer can be used to recover sign-on passwords from different profile (for other users on the same system) as well as from the different operating system (such as Linux, Mac etc). This greatly helps forensic investigators who can copy the Firefox profile data from the target system to different machine and recover the passwords offline without affecting the target environment.

Using FirePasswordViewer

FirePasswordViewer is the standalone application and it does not require any installation. You can just run it by double clicking on the executable file.

Here are the brief usage details.

  • On running, FirePasswordViewer automatically populates the Firefox profile location if it is already installed. Otherwise you can enter the profile location manually.
  • If you have set the master password for your Firefox, then you need to specify the same in the master password box.
  • Once the profile location is specified, you can click on "Start Recovery" button and FirePasswordViewer will instantly recover all passwords from Firefox sign-on store.
  • By default passwords are not shown for security reasons as it is sensitive data. However you can click on "Show Password" button to view these passwords.
  • Finally you can save all recovered password list to HTML file by clicking on "Save as HTML" button.

You can also use FirePasswordViewer to recover passwords from different system either Windows or Linux. In that case you can copy Firefox profile data from remote system to local machine and then specify that path in the profile location field for recovering the passwords.

Screenshots of FirePasswordViewer


Screenshot 2: Showing the hidden passwords recovered by FirePasswordViewer on clicking "Show Password" button.


Download FireFox Password Viewer Here
.........................................................................................................................................................................................

Hack Into Administrator Account

Hello friends, welcome back today i am going to share with you all possible ways to hack admin or administrator account in windows XP. Today i will explain how to hack admin or administrator account in just 2 minutes. So guys get ready to hack your friends systems in 2 minutes.
Most of times specially in our college we don't have the access to the admin account, now suppose you want to install a software on that system. What you will do now? Ask the admin to enter the password for you or simply hack it by yourself. I will tell you frankly that i have never opted method one in my life. Whenever i need administrator right i have hacked it but guys don't do it like that ways because i got suspended from lab twice for doing that.

how to hack admin password,hacking password,reset admin password, system hacking

There are four ways to hack the admin password:
1. Simply accessing Unprotected Administrator Account.
2. Hacking Through Net User Command.
3. Hacking Using the ERD(Emergency Rescue Disk)  Commander.
4. Resetting admin password using Ubuntu Live CD or DVD. 

Lets start from the first technique to hack the admin or administrator password..

1. Simply Accessing the Unprotected Admin or Administrator account.

How this hack works ? When we install windows XP on our system we usually rename the username as our name or some other keyword. But windows always creates the administrator account whenever we set up windows XP. So when you create your user account during install , windows creates two accounts that is one is your username account and other is Administrator account. But the main thing is that you will only see the account with your username and the Administrator account is hidden but its there and you can easily access that using the following steps:
Step1: Start your computer.
Step2: Now let it start until the windows user's username appears as shown in snapshot below...
how to hack admin password,hacking password,reset admin password, system hacking

Step3: As This Window Appears Press Ctrl+Alt +Delete (2 times).. Now the Windows like shown below appears..

how to hack admin password,reset admin password,hack computer password

Step4: Now as shown above Enter the Administrator on the Username box and press enter... Now you will be login in the admin account can easily rest the password...

For Resetting password you can follow two Procedures..
Procedure 1: Goto Start --> Control Panel --> User Accounts.. Now select the account whose password u want to reset.
Procedure 2 : Follow the Next method i.e hacking password through Net User Command.

Note: Hack 1 will only work if Administrator(default) is unsecured i.e User as some other username like above shown figure...


2. Hacking admin or administrator account using net user command
Note: This will work only when user has access of user account or some how he has been allowed  or working in admin account.

Steps to hack admin account:
Step1: Goto the Start and click on Run and Type cmd and press enter ... 
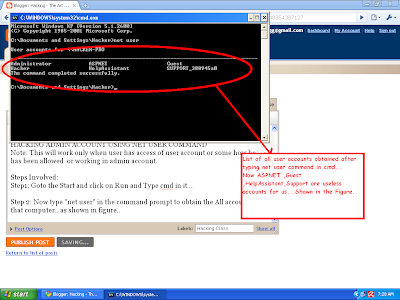
Step 2: Now type "net user" in the command prompt to obtain the All accounts on that computer.. as shown in figure..

how to hack admin password,reset admin password,hack computer password,windows password hacking


Step 3: Now Select the account Which u want to Reset the Password...
Suppose that we want to Reset the Password  of Administrator...
Now Type "net user Administrator *  " Without quotes... and press Enter. As shown in the Below Figure..

reset admin password,hack computer password,windows password hacking

Step 4: Now after that press Enter Twice to rest the password. Now Next time u open that Account .. It will not require any Password..


3. Hacking admin account using ERD commander (100% working hack)
This hack has no restrictions , using this hack you can hack each and every computer.

First of all Download the ERD(Emergency Rescue Disk)  commander... Extract the Files and Make a CD...

STEPS INVOLVED :
1. Insert the ERD Commander Boot CD into the drive and restart the system
2. Boot the computer using ERD Commander Boot CD. You may have to set the boot order in the BIOS first.
3. Select your Windows XP installation from the list as shown.


How to hack Admin Account
4. From the ERD Commander menu (Start menu), click System Tools and click Locksmith
How to hack Admin Account

5. Click Next

How to hack Admin Account

6. Select the administrator account from the list for which you want to reset the password.
How to hack Admin Account

7. Type the new password in both the boxes, click Next and click Finish

How to hack Admin Account

8 . Restart The System and take the CD out of the Drive..And Enjoy Admin account...

Method 4: Resetting windows password using Ubuntu Live CD or DVD
For this hack you will require the Ubuntu Live CD.

Steps involved :

  1. Insert Ubuntu Live CD and boot from it.
  2. Open terminal and install chntpw in Ubuntu. To do so use the following commands.
    sudo apt-get update
    sudo apt-get install chntpw
  3. Now mount your Windows volume. In my case it was dev/sda1. Replace it with yours.
    sudo mkdir /media/WINDOWS
    sudo mount /dev/sda1 /media/WINDOWS
  4. Now navigate to the Windows configuration folder.
    cd /media/WINDOWS/WINDOWS/system32/config/
  5. To reset the administrator password enter
    sudo chntpw SAM
  6. After completing this command you will see 5 different choices. Select the 1st one and press Enter and its done. 
  7. Now restart your system, it will not ask any password.  
......................................................................................................

How To hack facebook password for free

Hello friends today i will explain you how to hack the Facebook password or accounts remotely using keylogger. Its a 100% working hack and you can easily hack anyone's Facebook account or password using this hack. In this tutorial i will explain you how to hack Facebook and other passwords of any user using 100% FUD keylogger. The keylogger in this tutorial we will discuss is L33ts keylogger and its 100% FUD(fully undetectable).

Hacking Facebook account
is very easy and just requires not more than 10 minutes of work. Don't worry i will also tell you how to protect your facebook account or passwords from such hacks and hackers. But for this you must know how hackers hack your facebook account. So first i teach you how to hack facebook account remotely and then i will tell how to protect yourself from this.

NOTE: This tutorial is for Educational purposes only i.e. to make you aware how hackers hack your Facebook accounts. Please don't misuse it. I and Isoftdl is not responsible for any damage caused by you.

 So guys lets start hacking Facebook account or passwords....
Steps to hack Facebook account using Keylogger:
1. Creating the Keylogger Server to hack Facebook passwords.
2. Extracting the Icon from installer.
3. Bind the keylogger server with any software setup.
4. How to spread your keylogger or send it to your friends to hack their Facebook accounts or passwords.


Step 1. Creating the Keylogger Server
1. Download the keylogger.
2. Extract the file, Now you will get two folders:
a. First one contains Keylogger and Binder
b. Second Contains resource hacker tool.( to extract the icons from installers).

3. Now open the Keylogger. It contains two files one for gmail email and other for password. For this create one test account on Gmail and enter it's details in this.

hack facebook password,how to hack facebook,how to hack a facebook account

4. After entering email and password. Set the time interval usually set 3 mins i.e. after how much time you want to receive logs from the user.
5. Now click on send verification mail. This mail is to test that your keylogger is working correctly or not.
6. After you click this you will receive a confirmation mail on test account which will confirm that keylogger is working.
7. Now click on generate to set the mutex (any secret key to make your keylogger FUD) and then click on compile server.
8. Now save the file to desktop or any other location of your choice. Now your server is ready but it can be easily detected.


Step 2.: Extracting the Icon file from any installer(resource hacker)
1. Open the Resource hacker folder and open the reshacker file.
2. Now go to its menu and open any setup file. Suppose we want to attach our keylogger to Ccleaner setup file. So open the Ccleaner setup with resource hacker. 
3. Now in menu there is one action button click on it and then click save all resources.

how to hack facebook passwords,facebook hack, how to hack into someones facebook


4. Now save all the resources to desktop or any other location of your choice.
5. It consists of two files one is icon file and other is res file . We only need icon file, so you can delete the other file i.e res file.
6. Now we have Icon of installer file(as discussed above Ccleaner setup Icon).


Step 3: Bind the Keylogger server with any software
1. Now Go to keylogger folder and open the Binder.
2. Now Click on + button given below to add files.
3. Now add the keylogger server and the set up of software (i.e. in our case it's Ccleaner setup).
4. Now in menu of Binder, Go to Settings. There select the icon that we have generated in the previous step and set the location of output file as shown in figure.

facebook password hack,how to hack someones facebook,facebook password hacker,facebook hacking


5. Now again go to File's menu in Binder and click on Bind files.
6. Now your Binded keylogger is ready. Now you have to spread it or send it to the victim that is your friend.


Step4 : How to Spread Keylogger or send it to victim or friend
1. Now you have one Software setup file with keylogger attached with it.(In our case we have Ccleaner setup with keylogger attached with it.
2. Now Spread your keylogger through forums. You might be a member of various forums use them to spread your keylogger in form of software posts. You can use various software's to spread them that users frequently download.
3. Spread it through pendrives or USB hard drives. Suppose a friend asked you for a software give it the software that has keylogger attached with it. 
Note: you can also attach keylogger with images also. But that can be detectable by antivirus. So avoid such type of hacking.
So isn't that so easy to hack anyone's Facebook account in just few minutes. 

How to protect yourself from these hacks?
Prevention is always better than cure so always follow these steps:
1. Don't use cracked softwares and don't download them from unauthorized websites.
2. Always keep your antivirus and anti-spyware up to date.
3. Always scan the files before transferring them to your USB.
4. Do not allow other users to use your PC i.e password protect it.
................................................................................................................................................................

Configuring VNC-SERVER And Squid Proxy Server in CentOS

Configuring VNC-SERVER And Squid Proxy Server in CentOS (32 & 64) based VPS
Installing GUI based Gnome-Desktop, squid, vnc, vnc-server, firefox in centos based VPS
NOTE :-

# stands for comment
$ denotes sshell commands

1st. Open SSH of your VPS with your Favorite SSH client.

2nd. In Shell Prompt >_ Write commands as described below.

Code:
$ yum update -y

Phase of Installing All Products...

Code:
$ yum groupinstall gnome-desktop -y
# This will install 4 apps at once !
# 1 squid is advance proxy server
# 2 vnc is vnc viewer client
# 3 vnc-server is VNC server to operate remove computer's GUI interface of gnome from your desk.
# 4 firefox will unlease speed of internet as it is installed in VPS !

Code:
$ yum install squid vnc vnc-server firefox -y


# Configuring VNC-SERVER in CentOS based VPS....

# Set Your VNC Password For login..
Code:
$ vncpasswd
# Start vncserver to generate default config files...
Code:
$ vncserver


# As files are generated, we need to terminate vnc process(s) in order to make custom gnome configs..
Code:
$ pkill vncserver
$ pkill Xvnc
$ reboot


# Add gnome based configuration in this FILE via 'vi' editor..
# -To Edit Or Insert Text in vi editor Press 'i'
# -To Save Modified File Press 'Esc' > ':wq'
# -To Quit With-Out Saving 'Esc' > ':q!'
# -To break vi process 'Ctrl + C'

Code:
$ vi ~/.vnc/xstartup

# Add below code into file 'xstartup'
-- CUT - PASTE--
PHP Code:
#!/bin/sh
 
( while true; do xtermdone ) &
 
# Uncomment the following two lines for normal desktop: unset SESSION_MANAGER
exec 
/etc/X11/xinit/xinitrc
 
[ -/etc/vnc/xstartup ] && exec /etc/vnc/xstartup [ -r $HOME/.Xresources ] && xrdb $HOME/.Xresources
xsetroot 
-solid grey
vncconfig 
-iconic & xterm -geometry 1024x768 -ls -name "$VNCDESKTOP Desktop" & gnome-session 
-- CUT PASTE--


# To auto-start vnc server each time system boot.
Code:
$ chkconfig vncserver on


# To start vnc-server at a time.
Code:
$ service vncserver start

Now open vnc-viewer in your desktop and give IP of vps with :1
i.e 42.23.1.4:1
where :1 is port 5901 by default used by vnc-server in linux


# Configuring Squid Proxy Server in CentOS (32 & 64) based VPS....


# Switch to squid directory
Code:
$ cd /etc/squid


# move default squid configuration as a backup file !
Code:
$ mv squid.conf squid.conf.backup


# Receive Pre-made squid.conf file..
Code:
$ wget http://pastebin.com/download.php?i=Y8j35JS9 --output-document=/etc/squid/squid.conf

-- NOTE | Caution --
Change directives like mentioned below for confort !
.
.
.

# Change the default port 3128 to 8080 or 80 ! as per your need.
Code:
http_port 3128


# Check ur ip > tracemyip.org
# You should add your own range to get access to proxy server Or else it will show unauthorised access...

Code:
acl range_airtel src 122.0.0.0/255.0.0.0

...

http_access allow range_airtel
i.e.

Code:
acl range_US src 209.0.0.0/255.0.0.0

...

http_access allow range_US
.
.
-- End of NOTE | Caution --

_


# Make SQUID as service AS it should start at system-start (boot time)
Code:
$ chkconfig squid on


# Starting squid proxy server
Code:
$ service squid start


# Cross-Verify listening post via below command
Code:
$ netstat -tulpn | grep 3128

open your browser & set proxy IP & PORT in your browser & Bingo!
i.e IP: 42.23.1.4 Port: 3128
Thanks To aa-Numb
> For Educational Purpose Only ! 

Facebook Hacking Course

Facebook is termed as one of the biggest country in the world, as it is biggest social network today with millions of daily users. No doubt that it is one of the best target for hacking profiles & passwords for tampering. The very biggest mistake users do is “Lack of Awareness”
The only thing you can prevent hackers from attacking your account is to get to know how exactly hackers hack the Facebook. Rafay baloch, my good friend & best in class ethical hacking blogger has just launched his new online product which is “Facebook Hacking course” . He has already written and sold hundreds of copies of his book Beginners Guide to Ethical Hacking.
The Facebook Hacking Course contains series of videos which will tell you exactly how hackers hack facebook accounts, What methods they use and how you can prevent  yourself from these attacks.
What Exactly is Included in Facebook Hacking Course
This hacking course is presenting very cool Video Modules with step by step guide to hack Facebook passwords. These modules are very nicely compiled for beginners as well as advanced users. I have personally gone through its modules and Rafay is a great teacher in Hacking – I Must say. He have also included one of my favorite Sandboxie module fro checking & executing infected applications in sandbox.
Facebook Hacking Course Review

Not Just this Amazing Course,  ”You Also Get these Goodies For Free

1.Secret Anonymizing Techniques
This section will contain 2 bonus videos which will tell you the exact methods used by hackers to hide their identity while doing malicious things online.  Another awesome tutorial !!!
2.Direct Email Access and support
If you get stuck any where, or have some problem executing the tutorial – You can send an email to rafay baloch and he will help you no matter how much time it takes him. What else you need – a great product &personal help from expert.
So Do Not Wait at All & get access to the amazing Facebook Hacking Course with two great bonuses from Rafay Baloch.

Hack Computers Inside LAN Network

Today,I will write about hacking computer inside the LAN network.

This technique will be taking advantage of Port 139.

Most of the time,Port 139 will be opened.

First of all,I will do a port scanning at the target computer which is 192.168.40.128.

This computer is inside my LAN network.

I will scan it using Nmap.

[Image: 1_13.jpg]

I get the result and it shows Port 139 is opened up for me.

Now you will need both of these tools:
** USER2SID & SID2USER
** NetBios Auditing Tool

You can get both of them on the Internet.

After you get both of them,put them in the C:\ directory.

[Image: 2_1.jpg]

You now need to create a null session to the target computer.

[Image: 3_3.jpg]

Now open the Command Prompt and browse to the USER2SID & SID2USER folder.There will be 2 tools inside it,one will be USER2SID and another one will be SID2USER.

We will first using USER2SID to get the ID.

[Image: 4_10.jpg]

We will test against the Guest account because Guest account is a built in account.

After we get the ID,we need to do some modification on the ID.

We take the ID we get from the guest account and modified it become
"5 21 861567501 1383384898 839522115 500".

Please leave out the S-1-,leave out all the - too.

[Image: 5_8.jpg]

Now you will see that you get the username of the Administrator account.

In this case,the Administrator account is Administrator.

Create a text file called user.txt and the content will be the username of the Admin account.

[Image: 6.jpg]

Prepare yourself a good wordlist.

[Image: 7.jpg]

Now put both of them in the same directory with the NetBios Auditing Tool.

[Image: 8.jpg]

Now we are going to crack the Admin account for the password in order to access to the target computer.

Browse to the NetBios Auditing Tool directory.

[Image: 9_1.jpg]

Press on enter and the tool will run through the passlist.

[Image: 10.jpg]

In this case,I have get the password.

In order to proof that I can get access to the target computer using this password.

[Image: 11.jpg]

After you press enter,it will prompt you for the username and password.

[Image: 12_6.jpg]

Therefore,just input them inside the prompt and continue.

[Image: 13.jpg]

Target C drive will be on your screen.

[Image: 14.jpg]

In order to prevent from this attack,close down port that you do not want to use such as Port 135,Port 136,Port 137,Port 138 and Port 139.

The download link of the tools will be:
Download Tools.rar

Spoof MAC Address in Any OS


MAC address (Media Access Control address) is a quasi-unique identifier consists of a six byte number that attached to most network adapter card or network interface card (NIC). As such, all network cards, whether it’s of Ethernet NIC, Gigabit Ethernet NIC or wireless 802.11a/b/g/n WiFi or HiperLAN adapter, should have different MAC addresses, which also known as Ethernet Hardware Address (EHA) or adapter address.

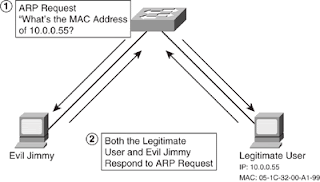
In operating system, MAC address is often represented in 12-digit hexadecimal number. For example, 1A-2B-3C-4D-5E-6F. In practical usage, layer 2 MAC address is converted from layer 3 protocol addresses such as Internet Protocol (IP address) by ARP (Address Resolution Protocol), which then allowed each host to be uniquely identified and frames to be marked for specific hosts on broadcast networks, such as Ethernet. After translated (or when a host on LAN sends its MAC address to another machine which does n ot configured not to accept unrequested ARP replies on the network for preemptive caching), MAC address is cached on source PC ARP table for later use. Content of ARP table on each computer can be viewed by typing arp -a in Windows or arp in Linux. MAC address thus forms the basis of most of the layer 2 networking upon which higher OSI Layer protocols are built to produce complex, functioning networks.
There are many reasons or possibilities that an user may want to change the MAC address or a network adapter, which also known as MAC spoofing. For example, to bypass the MAC address filtering on firewall or router. The trick can be used to get pass the network access restriction by emulating a new unrestricted MAC address, or to gain access connection by spoof an authorized MAC address after sniffing the legitimate MAC address out of the air in MAC filtering Wi-Fi network.
Beside, hackers or enthusiasts also spoofing another host’s MAC address as their own in order to receive traffic packets not meant for them, although ARP poisoning technique is more commonly used. However, changing MAC address can still keep the real information from been detected and logged by various services such as IDS, firewall, DHCP server, wireless access points and etc, and is essential protect user’s privacy. MAC spoofing also potentially trigger a Denial of Service (DoS) attack by causing routing problem with duplicating MAC address exists in the network, especially those similar with gateway and AP router’s BSSID (Basic Service Set Identifier.)
Whatever the reason, it’s pretty easy to change the MAC address or perform MAC spoofing on most of today’s hardware, listed below. Actually, the original MAC address is burnt and imprinted to the network card, and cannot be changed. However, operating system can spoof as if there is different MAC address for the network interface card using tricks below.
Change the MAC address in Windows
  1. Go to Start -> Control Panel. Double click on Network Connections (inside Network and Internet Connections category in Windows XP). The, right click on the active network connection with network adapter that you want to change the MAC address (normally Local Area Network or Wireless Network Connection) and click on Properties. Above steps work in Windows XP, Windows 2000 and Windows Server 2003. For Windows Vista, access to NIC’s properties is from Control Panel -> Network and Internet -> Network and Sharing Center -> Manage Network Connections.
    Alternatively, if you already know which network adapter that’s responsible for your network or Internet connection, go to Device Manager and open the properties dialog by double click on the NIC itself.
  2. In the General tab, click on the Configure button.
  3. Click on Advanced tab.
  4. In the Property section, select and highlight Network Address or Locally Administered Address.
  5. To the right, “Not Present” radio button is by default selected as value. Change the value by clicking on radio button for Value:, and then type in a new MAC address to assign to the NIC. Change MAC Address of Network Adapter
    The MAC address consists of 6 pairs of numbers (0 – 9) and characters (A – F) combination. For example, 88-17-E8-90-E2-0A. When entering the new MAC value, omit the dash (-), for example 8817E890E20A.
  6. Click OK when done.
  7. To verify the change of MAC address, go to command prompt, then type in one of the following commands: ipconfig /all
    net config rdr
  8. Reboot the computer if successful to make the change effective.
Note: To restore or reset back to original default MAC address, simply set back the option to “Not Present”.
Change the MAC Address of NIC in Windows via Registry
  1. Open a command prompt.
  2. Type the following command and hit Enter. ipconfig /all
  3. Record down the Description and the Physical Address (is MAC address) of the active network connection (discard those with Media Disconnected state). Get MAC Address for Network Card
    For example, in figure above, Description is Intel(R) Wireless WiFi Link 4965AGN and MAC address is in the format of 00-XX-XX-XX-XX-XX.
  4. In the command prompt also, type the following command and hit Enter. net config rdr
  5. Record down the GUID for the MAC address for the active connection’s NIC which MAC address to be changed. The GUID is contained within the { and } brackets right in front of the MAC address as shown in figure below. GUID for the NIC
  6. Type regedt32 or regedit in Start -> Run box or in Start Search for Windows Vista. Note: for Windows NT 4.0 and Windows 2000, regedt32 must be used.
  7. Navigate to the following registry key: HKEY_LOCAL_MACHINE\SYSTEM\CurrentControlSet\Control\Class\{4D36E972-E325-11CE-BFC1-08002BE10318}
  8. Expand the {4D36E972-E325-11CE-BFC1-08002BE10318} tree, and there will be more sub-keys in the form of 0000, 0001, 0002 and so on.
  9. Go through each sub-key starting from 0000, look for subkey that has DriverDesc value data that matches NIC description copied from step above, that want its MAC address to be changed. In most cases, it will be similar to the network adapter card name. To verify that the subkey found is indeed a correct one, check the value of the NetCfgInstanceId, which should have the same value with the NIC’s GUID taken from step above.
  10. Once a sub-key is matched to the network interface card that MAC address want to be spoofed, select and highlight the subkey. Right click on the sub-key (for example, 0000), then select New -> String Value. Name the new value name as NetworkAddress. Note: If NetworkAddress REG_SZ registry key is already existed in the right pane, skip this step.
  11. The double click on NetworkAddress and enter a new MAC address as its value data. Change and Spoof MAC Address in Registry
    Note that the 12-digit MAC address in hexadecimal format, and should be entered without any dash (-). For example, 1A2B3C4D5E6F.
  12. Reboot the system to make the new MAC address effective. Alternatively, if you don’t want to restart the system, try to disable and then re-enable the network adapter in Device Manager.
  13. To verify the change of MAC address, go to command prompt, then type in one of the following commands: ipconfig /all
    net config rdr
Note: To restore or reset back to true original hardware burned-in MAC address, remove the NetworkAddress registry key that is been added.
Alternative: Third party tools and utilities to change the MAC address in Windows operating system are plenty, for example: SMAC (direct download link to smac20_setup.ex, supports Windows Vista, XP, 2003, 2000), Macshift (direct download link to macshift.zip, for Windows XP), BMAC (almost identical SMAC MAC changer clone by moorer-software.com), Mac MakeUp (direct download link to macmakeup.zip, for Windows 2000/XP/2003/Vista), MadMACs (MAC Address Spoofing And Host Name Randomizing App For Windows, directly download MadMACs.zip), EtherChange (direct download link to etherchange.exe), and Technitium MAC Address Changer (for Windows 2000 / XP / Server 2003 / Vista / Server 2008).
How to Change MAC Address (MAC Spoofing) in Linux and *nix
To change your MAC address in Linux and most Unix-like (*nix) system, run the following script commands:
ifconfig down
ifconfig hw
ifconfig up
For example, the command looks lik “ifconfig eth0 down hw ether 1A:2B:3C:4D:5E:6F”. First command brings down the network interface, second command change its MAC address while third command bring up the interface again. Note that in some cases, to bring down and bring up the network interface, the following commands have to be used:
/etc/init.d/networking stop or /etc/init.d/network stop (in the case of Fedora Core 5)
/etc/init.d/networking start or /etc/init.d/network stop (in the case of Fedora Core 5)
Alternatively, for Fedora Code 5 Linux with Iproute2 tools installed, the following commands also can change the MAC address to spoofed version:
/etc/init.d/network stop
ip link set address 1A:2B:3C:4D:5E:6F
/etc/init.d/network start
For example, “ip link set eth0 address 1A:2B:3C:4D:5E:6F”. To check whether the MAC address has been spoofed, use ip link ls eth0 or ip addr ls eth0 instead of using ifconfig eth0.
How to Make the Spoofed MAC Address Permanently Even After Reboot in Linux
Edit the ifcfg-eth0 file (or other similar file if you’re changing different interface), add the following variable line to the file:
MACADDR=12:34:56:78:90:ab
Then run service network restart to make the change effective immediately.
How to Make the Spoofed MAC Address Permanently on Restart in Debian
Edit the /etc/network/interfaces file and add in the following variable line to the appropriate section so that the MAC address is set when the network device is started.
hwaddress 02:01:02:03:04:08
For example, “hwaddress ether 02:01:02:03:04:08″.
Alternative: GNU Mac Changer (for Debian, Slackware, ArchLinux, Mandrake, Crux and other RPM-based distributions such as Fedora, Red Hat, CentOS, ASPLinux, SUSE Linux, OpenSUSE and etc.
How to Change MAC Address (MAC Spoofing) in BSD or FreeBSD
Issue the following commands in shell:
ifconfig down
ifconfig
ifconfig up
First command brings down the network interface (optional), second command change its MAC address while third command bring up the interface again (optional). For example, the command looks lik “ifconfig xl0 link 1A:2B:3C:4D:5E:6F” or “ifconfig fxp0 ether 1A:2B:3C:4D:5E:6F”
How to Change MAC address in Solaris
The shell command to change the MAC address in Sun Solaris is as below:
ifconfig
For example, the command looks like “ifconfig hme0 ether 1A:2B:3C:4D:5E:6F”. Note that the change is temporary that does not persist after a reboot. To make this change permanent, the command can be placed in a runtime control script (/sbin/sh).
How to Spoof MAC Address in HP-UX
It’s possible to change MAC address using HP-UX SAM. Select Networking and Communications, then selecting the interface, then click on Action -> Modify -> Advanced Options. Finally, change the value of station address, which is MAC address name in HP-UX.
How to Spoof and Change MAC Address in OpenBSD
Use the following command to change MAC Address to spoofed MAC in OpenBSD (after version 3.8):
ifconfig lladdr
For example, “ifconfig bge3 lladdr 1A:2B:3C:4D:5E:6F”.
How to Change to Spoofed MAC Address Permanently in OpenBSD
To make the MAC address changed at boot before network connection is established, and even before parsing of hostname.* file, edit the /etc/netstart file to add in the following lines before the line of “# Now parse the hostname.* file”:
if [ "$if" = "INTERFACE" ]; then
ifconfig lladdr
fi

# Now parse the hostname.* file
....

How to Change MAC Address in Mac OS X
Since Mac OS X 10.4.x (Darwin 8.x) onwards, the MAC address of wired Ethernet interface can be altered in Apple Mac OS X in a fashion similar to the Linux and FreeBSD methods. To do so, type the following command in Terminal.app:
sudo ifconfig en0 ether aa:bb:cc:dd:ee:ff
or
sudo ifconfig en0 lladdr aa:bb:cc:dd:ee:ff (for Mac OS X 10.5 Leopard)
where en0 is the network interface (numbered from en0, en1, en2 …) and aa:bb:cc:dd:ee:ff is the desired MAC address in hex notation.
Alternative: MacDaddy (download MacDaddyX.dmg, support Airport wireless adapter)
Thanks To www.mydigitallife.info